October 26, 2026 · Indumor
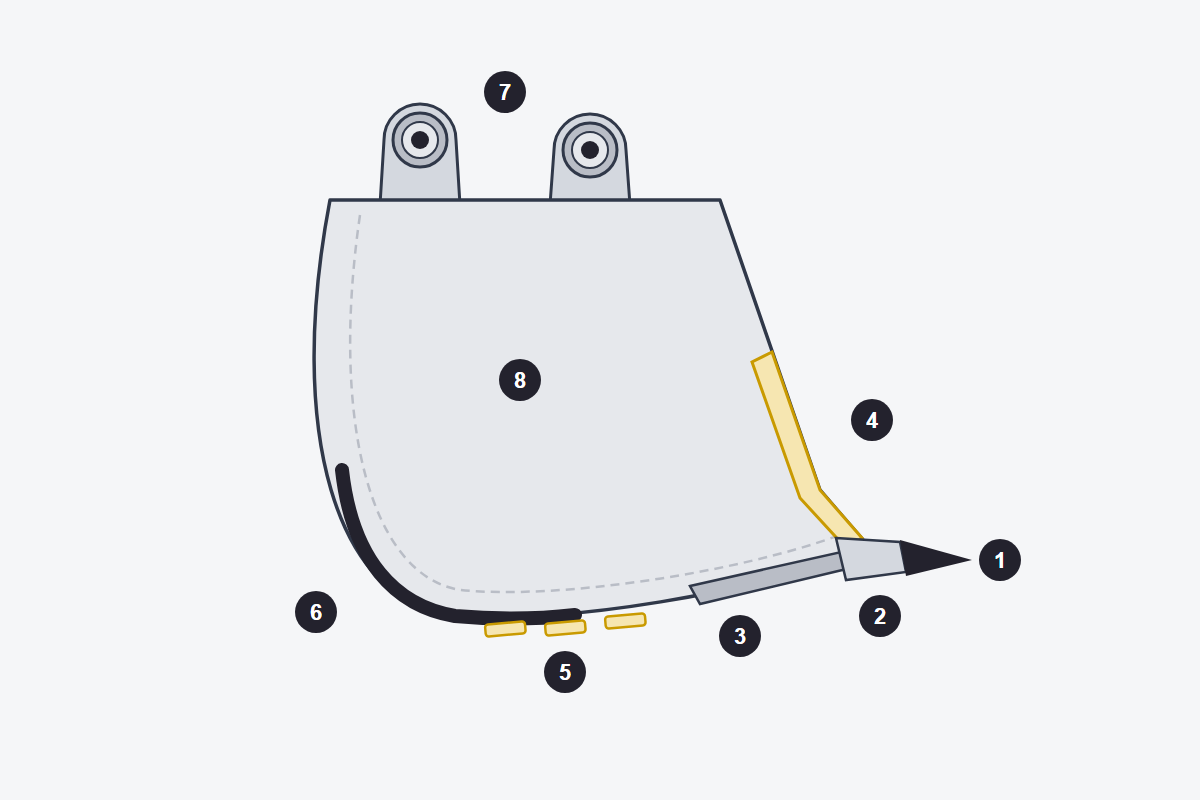
1 Tooth · 2 Adapter · 3 Cutting edge · 4 Side cutter · 5 Wear strips · 6 Heel · 7 Pin bosses, bushings and pins · 8 Side plate.
The bucket arrives at the shop on a truck, dried mud still caked in the bottom. Two corner teeth are missing, the adapter left bare is eaten halfway through and the heel has a hole you can put your hand through. It is a picture that comes back again and again, and it almost always started with one lost tooth nobody replaced in time.
The teeth, and that is by design. On a single adapter, tips get changed five to twenty times depending on the work before the adapter itself needs replacing. Corner tips wear faster than center ones, so rotating them and flipping them over, since the bottom face works harder, stretches the life of the set. With one or two tips missing, the cutting edge is exposed and wears fast, and an adapter without a tip loses its nose within hours.
On the shell, the heel takes the worst of it. The wear strips on the bottom are there for that reason: replaced in time they protect the floor; run to the end, they force a new floor. Life depends heavily on the ground. One tooth maker quotes more than 800 hours in dirt and 200 or less in high-quartz granite.
The cutting edge and wear plates are usually quenched steel of 400, 450 or 500 HB. They weld well if three things are respected: preheat according to thickness and hardness (500 HB from 13 mm up, 400 HB from 20 mm up), use low-hydrogen consumables and stay below about 225 °C between passes. Cold cracks can show up as late as 48 hours after welding, so the inspection happens the next day, not when the welder puts the gun down. Root and fill passes go in with a softer ER70-class filler; the hard stuff is kept for the last passes. And heating with a torch to straighten is out: above 200 to 250 °C the plate loses the hardness it left the mill with.
What pattern should the hardfacing follow? It depends on what the bucket digs. In sand or fine soil, beads across the flow; in large rock, beads parallel to it, so the stone rides on them; in soil with clay, a crosshatch, so the material packs into the cells and protects the base.
If the pin is loose, the bushing goes first, since it is a sacrificial part. If the bore itself is worn, ovalized or with a spun bushing, it gets rebuilt: measured on two axes at several depths, built up inside with weld and line-bored on the original axis to the new bushing's size. A reamer cannot fix an oval or misaligned bore; line boring can. To pull the pins, the bucket must be resting or blocked with the circuit depressurized, and hardened pins are never struck with a steel sledge, because shards fly.
Cracks in the bosses are opened up until no trace is left and filled with full penetration, and they should not wait: in that area they grow fast.
No maker publishes a number that says when a bucket stopped being worth it. The signs are of another kind: corners bent so far the edge must be replaced, a floor worn through from side to side, cracks that come back after every repair. To read further, see wear liners, welding defects and structure maintenance.
At Indumor we rebuild buckets, cutting edges and pin bosses. Even so, the cheapest repair starts before the bucket ever reaches the shop: with that lost tooth replaced in time.
Bring it in or send us photos of the bosses and the cutting edge, and we will see what is worth rebuilding.
© Indumor 2010–2026 — Industrial steel fabrication, Córdoba, Argentina
