October 31, 2026 · Indumor
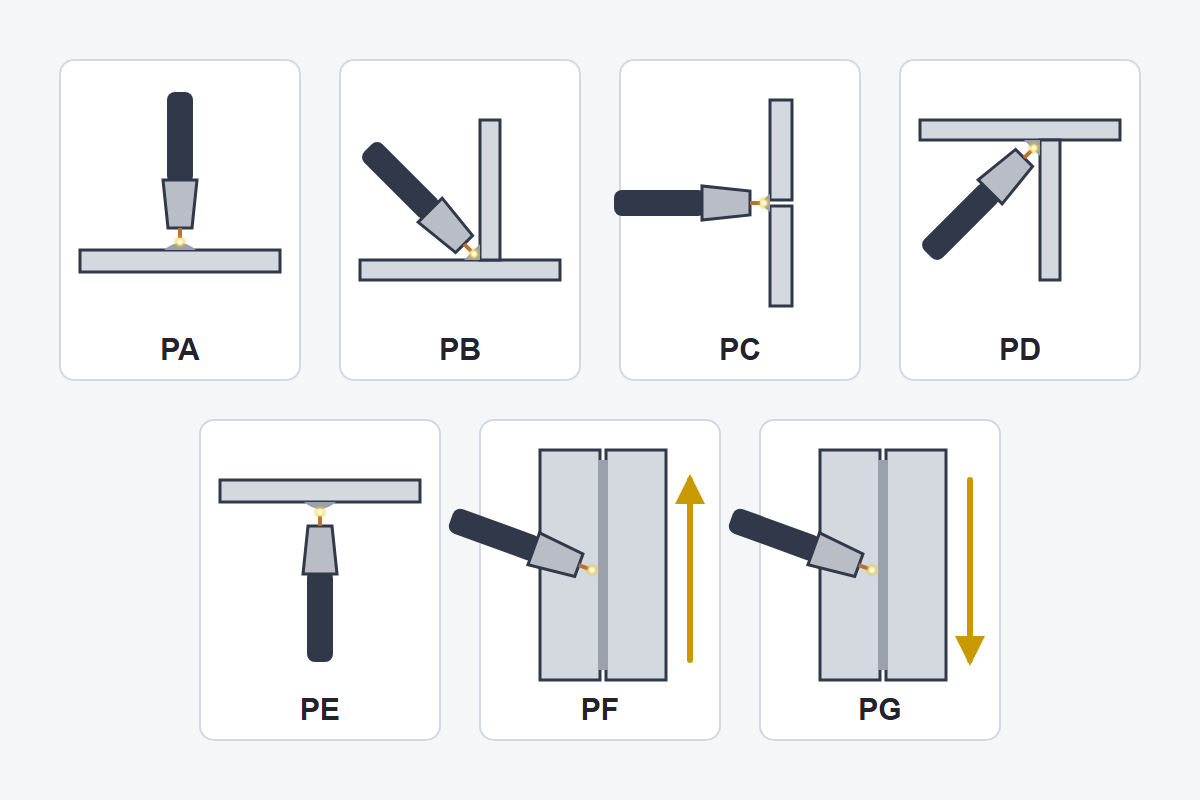
The seven ISO 6947 positions: PA flat, PB horizontal fillet, PC horizontal on a vertical wall, PD fillet from below, PE overhead, PF vertical up and PG vertical down. The arrows show the direction of the bead.
Have you ever had to weld something above your head? The pool that behaved like still water on the bench turns into a drop that wants to fall, the sparks go looking for your collar and your arm tires in two minutes. The same weld changes completely depending on how the part sits, and that is why procedures and qualifications talk about positions.
There are four basic joints: butt, T, corner and lap. On thin sheet, up to about 3 mm (1/8 in), a butt joint is welded from one side with square edges and a small gap. With more thickness the arc cannot melt through, so the edge is beveled: the most common is a V with about 60° included angle, a root face of 1 to 2 mm and a root opening of 1 to 3 mm. Thick plates that can be flipped do better with a double V, which takes less metal and balances distortion. If the root cannot be back-welded, it sits on a backing bar or a ceramic strip. In fillets, what counts is the throat, the height of the triangle inscribed in the bead: a fillet with 6 mm legs has a throat of about 4.2 mm.
Any of those joints can be welded in different positions. ISO 6947 gives them letters, the ones in the drawing. The North American equivalents are direct: PA is 1G or 1F, PB is 2F, PC is 2G, PD is 4F, PE is 4G, and PF and PG are 3G, up or down.
Flat and horizontal are comfortable, with the gun at about 45° to both plates on fillets and 10 to 15° of travel angle. In vertical up, PF, the pool rests on the weld below and the edges need time: you weave in a zigzag or a triangle, with a short pause at each side, and climb steadily. Vertical down, PG, is fast and shallow; it works on thin sheet in short-circuit and it is a trap on heavy sections, where it leaves lack of fusion. Overhead you turn the machine down, keep a small pool and a short stickout. For anything that is not flat, pulsed transfer helps a lot.
None of these techniques comes from reading. You have to get the hang of it on the test plate, and that is why hands-on courses spend whole days on each position. What reading does teach is how to avoid the problem: if the part can be turned, turn it. A positioner or a couple of trestles that leave the joint in PA or PB saves hours and gives more even beads than the best welder working vertical.
In the Indumor shop we turn built-up beams so their fillets are welded in PB rather than vertical, and they come out more even and in less time. If you have parts that need that kind of care, see how we handle welding and assembly, and the guide to welded plate girders to see how they are made.
Think of the answer before you open it.
Both are vertical: PF is uphill, from bottom to top, and PG is downhill, from top to bottom.
Because it is fast and shallow: the pool runs ahead of the arc and leaves lack of fusion at the edges.
About 5.6 mm: the throat is the leg times 0.7.
Whether the part can be turned so the joint is welded in PA or PB. It is faster and the bead comes out better.
We fit up and weld in our shop, turning the part so every bead is made in the best position.
© Indumor 2010–2026 — Industrial steel fabrication, Córdoba, Argentina
