October 31, 2026 · Indumor
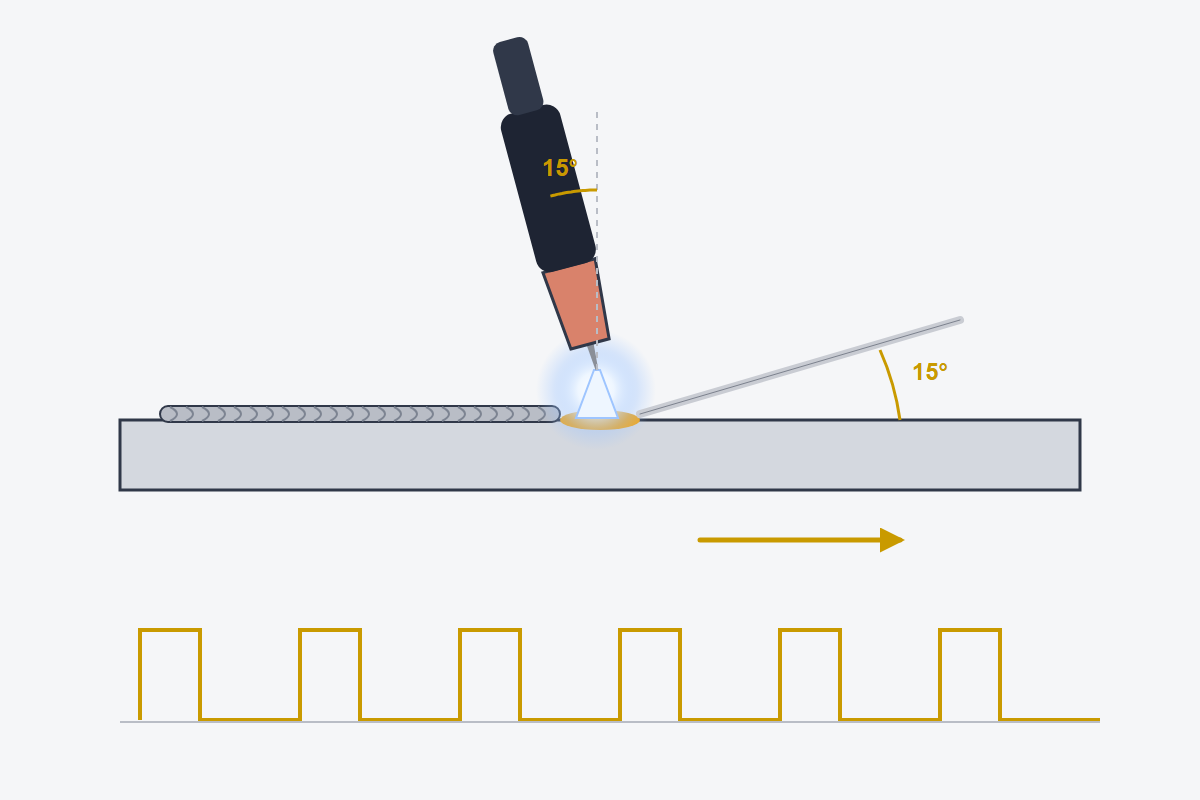
In the drawing: the torch tilted about 15° toward the direction of travel, the rod entering at the leading edge of the pool, about 15° from the plate, and a short arc, about as long as the tungsten diameter. Below, pulsed current: peaks and background.
What current does 2 mm (0.08 in) steel sheet need under a TIG torch? An old rule of the trade says one amp per thousandth of an inch, which in millimeters comes to about 40 A per millimeter: around 80 A for that sheet. It is a starting point, not a recipe, and what follows explains why.
That rule holds for carbon steel on DC electrode negative. Stainless conducts heat less well and makes do with somewhat less; aluminum conducts far better and, on AC, asks for quite a bit more. Position counts too: vertical and overhead, the current comes down so the pool does not fall.
The arc is kept short, about as long as the tungsten diameter. A long arc spreads out, loses force, overheats and lets air in. The torch is tilted 10 to 20° toward the direction of travel, and the rod enters at the front of the pool, about 15 to 20° from the plate. Travel speed is slow compared with MIG: on 2 mm sheet, a TIG bead advances roughly 10 to 25 centimeters per minute (4 to 10 in/min). That is why heat input is watched: with 12 V, 115 A and 90 mm per minute, and the efficiency of 0.6 assigned to TIG, it works out to 0.55 kJ per millimeter, about 14 kJ per inch. Slowing down raises it right away.
Pulsing adds another tool. With slow pulses, one or two per second, the pool grows at the peak and cools at the background, and the welder times the rod to the pulse: a great help on thin sheet and in vertical. With very fast pulses, hundreds per second, the arc becomes narrower and stiffer. Inverter sources allow both.
In the shop, technique starts before the arc. The hand or the little finger rests on the part or on a support, because a resting hand trembles less, and you look for a position from which the whole bead can be run without shifting your stance. The part is tacked first, with small tacks placed in an order that balances distortion.
Then the sequence. Strike the arc, wait for the pool to form and only then add the rod, with short dabs at the leading edge. Between dabs the rod pulls back just slightly, but its hot tip stays inside the gas: if it comes out into the air, it oxidizes and goes into the next dab dirty. The torch moves forward steadily. At the end, the downslope shrinks the pool and the gas keeps flowing over the crater for a few seconds.
The same mistakes show up in almost everyone who is starting out. The long arc, out of fear of touching the part with the tungsten. The rod pushed into the arc instead of laid on the edge of the pool, which melts it into drops that land with a spatter. The torch that drifts away from the part every time the other hand adds metal. The torch held too upright, which leaves the pool under the tungsten instead of ahead of it. And the foot frozen on the pedal: current is a tool to use throughout the bead, not a value set at the start. And one more: tilting the torch so far that the gas blows sideways and leaves the pool unshielded. Even the grip matters: a torch clenched like a hammer shakes, while one held lightly, like a pencil, steadies the hand.
The rhythm of dab and travel is what leaves the even ripples of a TIG bead. It is learned on scrap sheet. Over hours. Many hours.
In TIG, tacks are made with low current and no rod, or very little, small tacks that the bead later melts in without leaving lumps. On thin sheet, tacks go close together and are placed alternating from one end to the other, so the part does not open up while it is being fitted. The bead is planned too: weld in short, alternating stretches when the part tends to move, and start a long joint in the middle and work toward the ends. Distortion is controlled before it shows up, not after. On a corner or T-joint, tacks go at the root of the corner, where the bead will melt them in.
Why do the same settings give different beads in two different hands? Because in TIG the hand decides almost everything: arc length, speed, how much rod goes in and when. The machine supplies the current; the rest is craft.
Think of the answer before you open it.
About 120 A, by the rule of 40 A per millimeter on DC electrode negative; it is a starting point.
Short, about the diameter of the tungsten.
Because if it comes out into the air it oxidizes, and that dirty tip goes into the bead on the next dab.
To let the pool grow at the peak and cool at the background, timing the rod to the pulse: it helps on thin sheet and in vertical.
Book the TIG welding of your stainless piping early.
© Indumor 2010–2026 — Industrial steel fabrication, Córdoba, Argentina
